WEIGEL FORUM
    • Categories
    • Recent
    • Tags
    • Popular
    • Users
    • Groups
    • Login
    1. Home
    2. DerMeldos
    • Profile
    • Following 0
    • Followers 0
    • Topics 99
    • Posts 110
    • Best 0
    • Controversial 0
    • Groups 2

    DerMeldos

    @DerMeldos

    0
    Reputation
    1
    Profile views
    110
    Posts
    0
    Followers
    0
    Following
    Joined Last Online

    DerMeldos Unfollow Follow
    WEIGEL administrators

    Latest posts made by DerMeldos

    • QuickGuide: NGINX Reverse Proxy with HTTPS
      1. Install Nginx
        On Ubuntu/Debian:
      sudo apt update
      sudo apt install nginx
      
      1. Configure Reverse Proxy
        Create a new file:
        /etc/nginx/sites-available/uptime
      server {
          listen 80;
          server_name uptime.ricardoweigel.de;
      
          location / {
              proxy_pass http://127.0.0.1:3001;
              proxy_set_header Host $host;
              proxy_set_header X-Real-IP $remote_addr;
              proxy_set_header X-Forwarded-For $proxy_add_x_forwarded_for;
          }
      }
      

      Enable the config:

      sudo ln -s /etc/nginx/sites-available/uptime /etc/nginx/sites-enabled/
      sudo nginx -t
      sudo systemctl reload nginx
      

      Now, visiting http://uptime.ricardoweigel.de will show your service running on port 3001 without exposing the port.

      1. Add HTTPS with Let's Encrypt
        Use Certbot:
      sudo apt install certbot python3-certbot-nginx
      sudo certbot --nginx -d uptime.ricardoweigel.de
      

      It will automatically edit your config to redirect HTTP to HTTPS.

      Result:
      Users go to: https://uptime.ricardoweigel.de
      Internally forwarded to: http://127.0.0.1:3001
      Clean, professional, and secure.
      posted in Linux
      DerMeldosD
      DerMeldos
    • File Transfer

      PULL from remote:

      rsync -chavzP --stats remote_username@remote_host:path/to/remote_directory path/to/local_directory
      

      *rsync is only possible if the local AND remote machine have the package installed.
      **rsync option explanation: Ubuntu Wiki

      scp -r remote_username@remote_host:path/to/remote_directory path/to/local_directory
      

      *Recursively copy the contents of a directory from a remote host to a local directory

      SEND to remote:

      rsync -chavzP --stats path/to/local_directory remote_username@remote_host:path/to/remote_directory 
      

      *rsync is only possible if the local AND remote machine have the package installed.
      **rsync option explanation: Ubuntu Wiki

      scp  path/to/local_file remote_username@remote_host:path/to/remote_file
      
      posted in Linux
      DerMeldosD
      DerMeldos
    • SecureCRT open new tab instead of open new window

      Step 1: Find SecureCRT Configuration Paths containing the file Global.ini
      Open SecureCRT > Options > Global Options > General > Configuration Paths

      Copy Configuration Folder and open this folder > find file Global.ini

      Step 2: Open Global.ini and change Single Instance value to 00000001
      Search for the line in Global.ini with the following text:

      ....
      D:"Single Instance"=00000000
      ....
      

      Change to

      ....
      D:"Single Instance"=00000001
      ....
      

      Save Global.ini file and test

      posted in Automation
      DerMeldosD
      DerMeldos
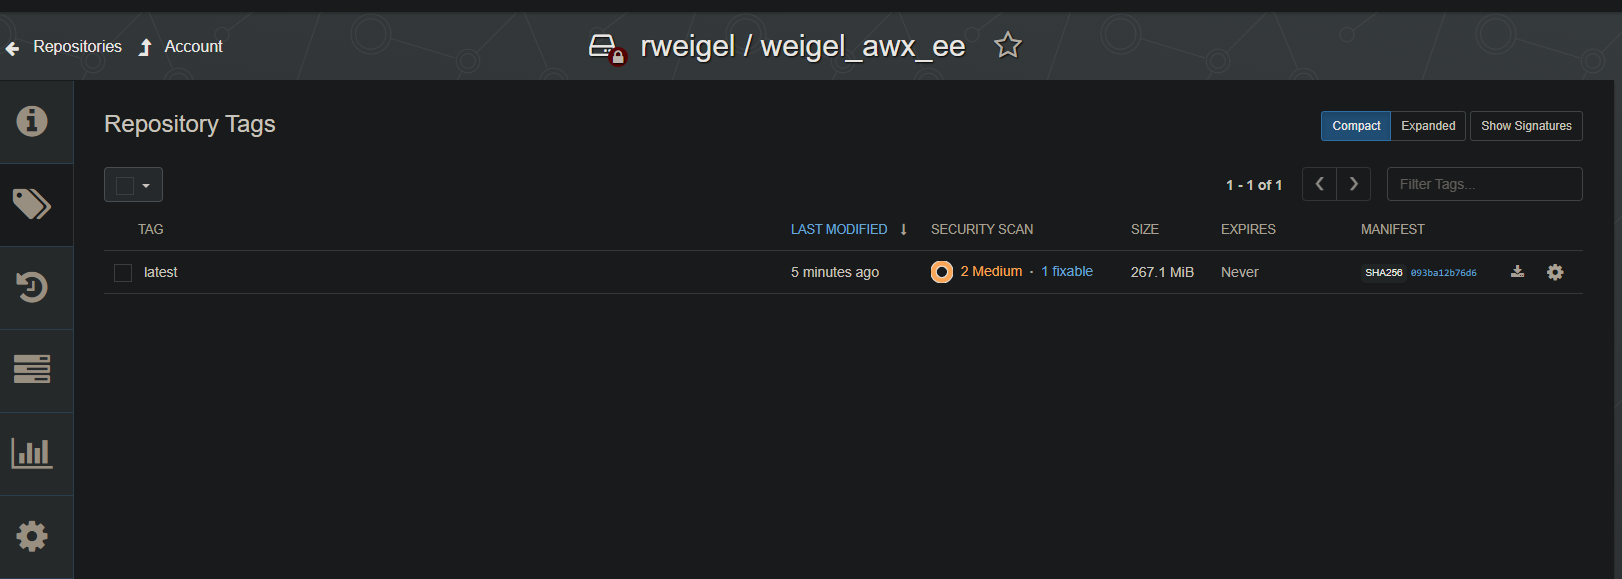
    • update podman image (Ansible AWX Custom EE)

      the virtual environment is located in /root/venv-ee

      root@TESTVM:~# cd venv-ee/
      

      enter the environment:

      root@TESTVM:~/venv-ee# source bin/activate
      

      edit your files, for example:

      (venv-ee) root@TESTVM:~/venv-ee/ee# vim requirements.txt 
      (venv-ee) root@TESTVM:~/venv-ee/ee# vim execution-environment.yml 
      

      Start building the new image:

      (venv-ee) root@TESTVM:~/venv-ee/ee# ansible-builder build -t weigel_awx_ee -v 3
      .......
      Complete! The build context can be found at: /root/venv-ee/ee/context
      

      Tag the local image:

      (venv-ee) root@TESTVM:~/venv-ee/ee# podman tag localhost/weigel_awx_ee:latest quay.io/rweigel/weigel_awx_ee
      

      Now you can push the latest image to your repo:

      (venv-ee) root@TESTVM:~/venv-ee/ee# podman push quay.io/rweigel/weigel_awx_ee:latest
      

      DONE!!!
      c6f6cf17-c6be-49d2-a0f8-9ce1babc7cbd-image.png

      posted in Linux
      DerMeldosD
      DerMeldos
    • SecureCRT Compatibility for Debian 12 and Ubuntu Version newer than 22.04 LTS

      install missing dependencies:

      wget http://mirrors.edge.kernel.org/ubuntu/pool/main/i/icu/libicu70_70.1-2_amd64.deb
      sudo dpkg -i libicu70_70.1-2_amd64.deb
      
      posted in Linux
      DerMeldosD
      DerMeldos
    • Create and Configure File Systems

      check and confirm the drive/partition you want to use.

      root@TESTVM:~# fdisk -l
      Disk /dev/sda: 32 GiB, 34359738368 bytes, 67108864 sectors
      Disk model: QEMU HARDDISK   
      Units: sectors of 1 * 512 = 512 bytes
      Sector size (logical/physical): 512 bytes / 512 bytes
      I/O size (minimum/optimal): 512 bytes / 512 bytes
      Disklabel type: dos
      Disk identifier: 0xd9de07a1
      
      Device     Boot    Start      End  Sectors  Size Id Type
      /dev/sda1  *        2048 65107967 65105920   31G 83 Linux
      /dev/sda2       65110014 67106815  1996802  975M  5 Extended
      /dev/sda5       65110016 67106815  1996800  975M 82 Linux swap / Solaris
      root@TESTVM:~# 
      

      RedHat -> xfs
      Ubunutu -> ext4

      mkfs.xfs /dev/sdb1
      mkfs.ext4 /dev/sdb1
      

      You can create a label for a new Filesystem using the -L option.

      mkfs.xfs -L "BackupVolume" /dev/sdb1
      

      b348547c-67bc-4b60-88d1-afc4b9ac5047-image.png

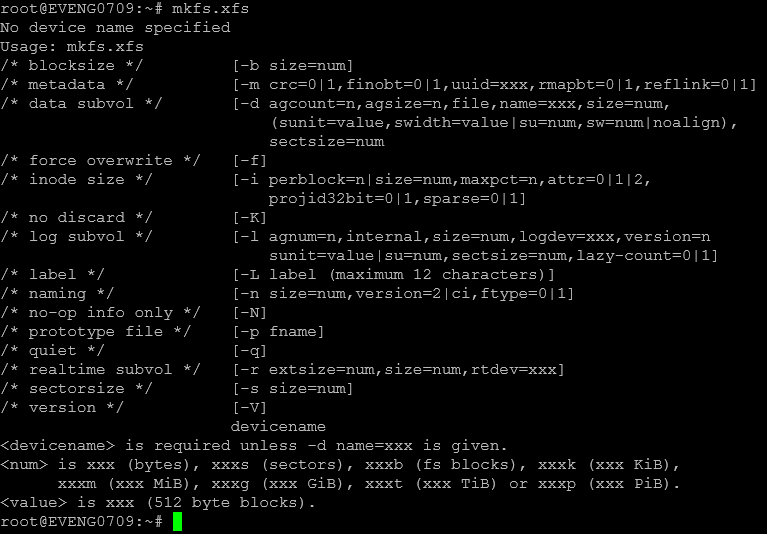
      using mkfs without any argument it will show you some option:
      66a6f198-9ff1-4916-97ae-75a5f20e7483-image.png

      The default behavior is not to override the existing filesystem. -f (force) option is available.
      e5db2857-95bf-4382-96ce-4d0315f58878-image.png
      labels chang be changed without overwriting the filesystem.
      170f4b52-3d47-40e9-9bcb-e5df55370ce7-image.png

      posted in Linux
      DerMeldosD
      DerMeldos
    • Ansible AWX Multiple Credentials for Play

      What Are Custom Credential Types?
      Custom credential types in AWX and AAP allow you to define new forms of credentials tailored to specific authentication needs. These can include SSH keys, API tokens, passwords, or any other unique authentication method required by your automation scripts. They are customizable templates that dictate how credentials are structured, stored, and used.

      Why Use Custom Credential Types?

      • Flexibility: Create credentials that match your specific needs.
      • Security: Ensure sensitive data is securely managed according to your organization’s policies.
      • Consistency: Standardize credentials across various automation tasks and environments.

      Creating Custom Credential Types in AWX/AAP

      • Log in to the AWX/AAP Web Interface: Open your browser and access the AWX dashboard.
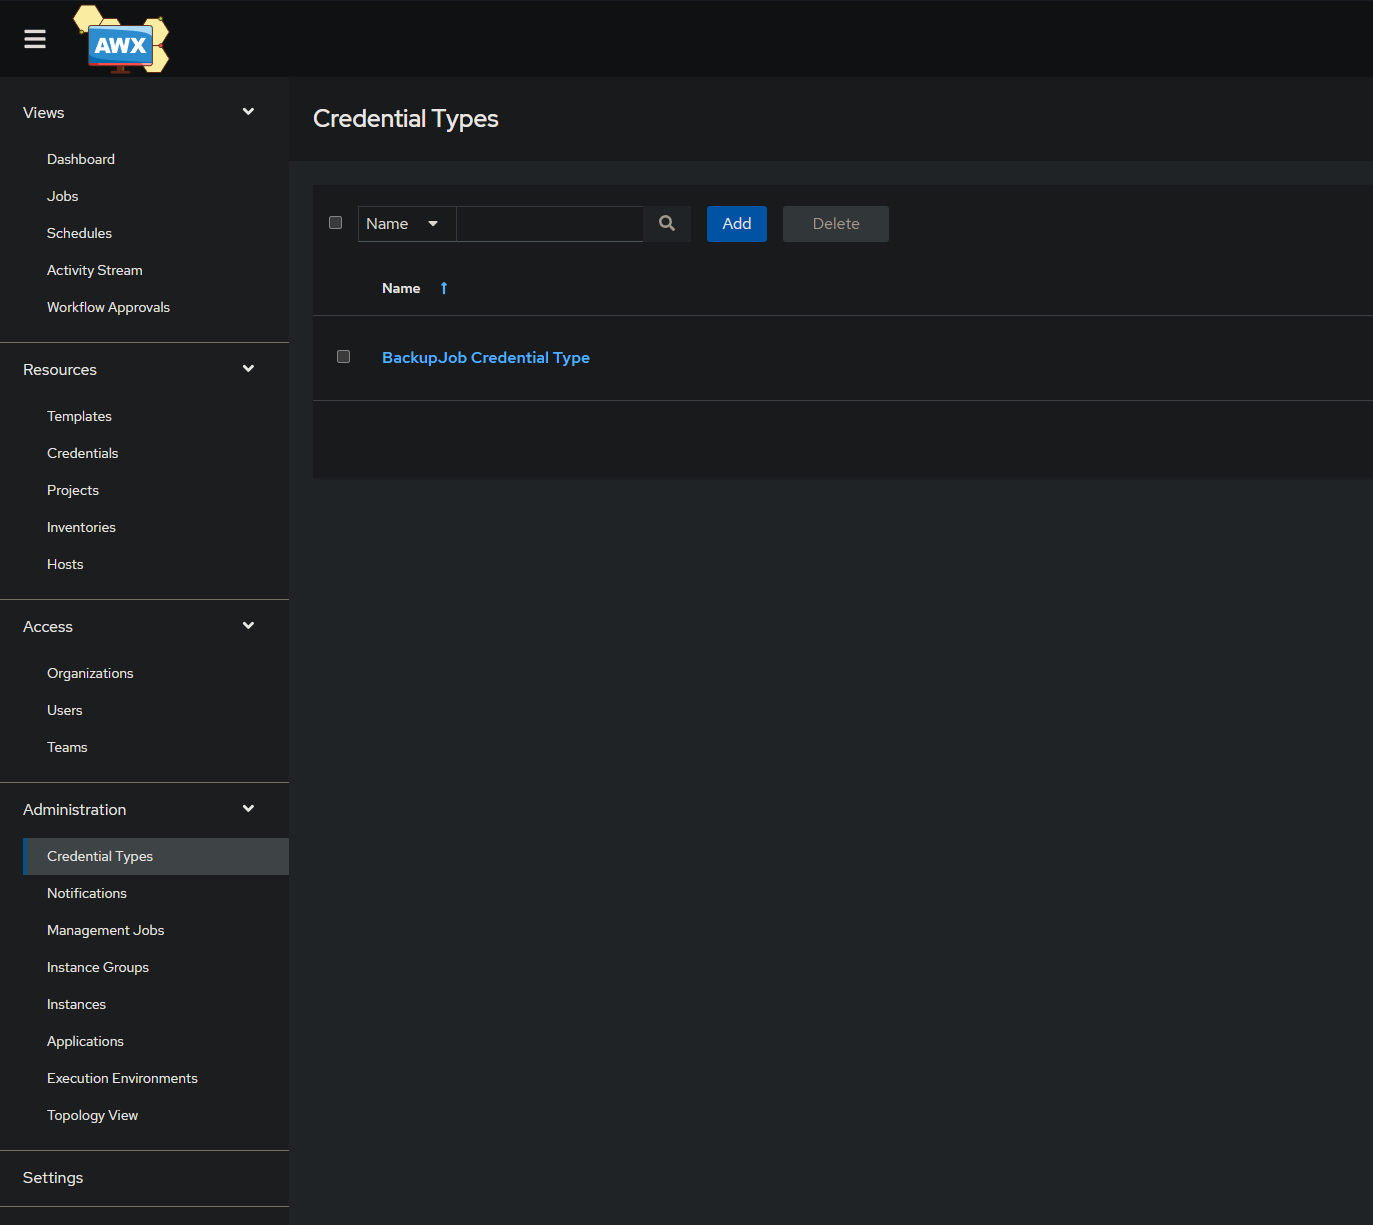
      • Navigate to the Credential Types Tab: Click on “Administration” in the sidebar, then go to “Credential Types.” and click "Add"
        88e76524-da84-4686-ad68-757d505d0557-image.png

      Create a New Credential Type:
      Example:
      Name: BackupJob Credential Type

      Add the input_configuration arguments:

      fields:
        - id: arista_username
          type: string
          label: arista username
        - id: arista_password
          type: string
          label: arista password
          secret: true
        - id: opnsense_username
          type: string
          label: opnsense username
        - id: opnsense_password
          type: string
          label: opnsense password
          secret: true
      required:
        - arista_username
        - arista_password
        - opnsense_username
        - opnsense_password
      

      Add the injector Configuration: - This is what is used to inject the credential in to the playbook

      extra_vars:
        arista_password: '{{ arista_password }}'
        arista_username: '{{ arista_username }}'
        opnsense_password: '{{ opnsense_password }}'
        opnsense_username: '{{ opnsense_username }}'
      

      Using Custom Credential Types in AWX/AAP
      The new credential type will now to available for you to use as a template to create new credentials

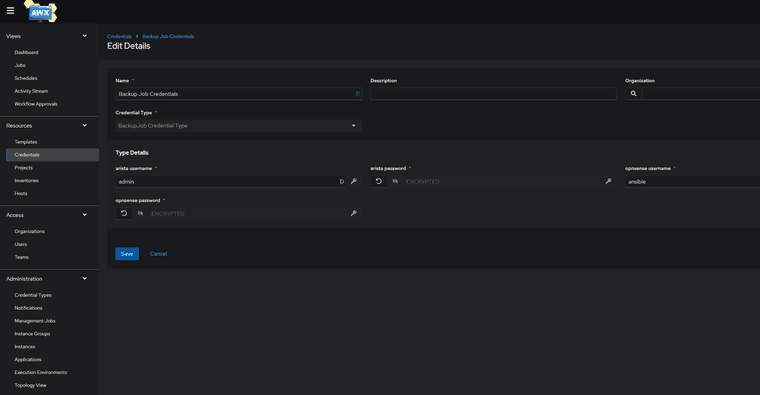
      • Create a New Credential:
      • Navigate to the Credentials: Click on “Resources” in the sidebar, then go to “Credentials” and click "Add"
      • Give it a name and Description
      • Form the Credential Type dropdown choose the Template you just created
      • Add your credentials and save your new credential
        ccbaddc5-c7d2-430c-aa7f-cfb201f0bada-image.png

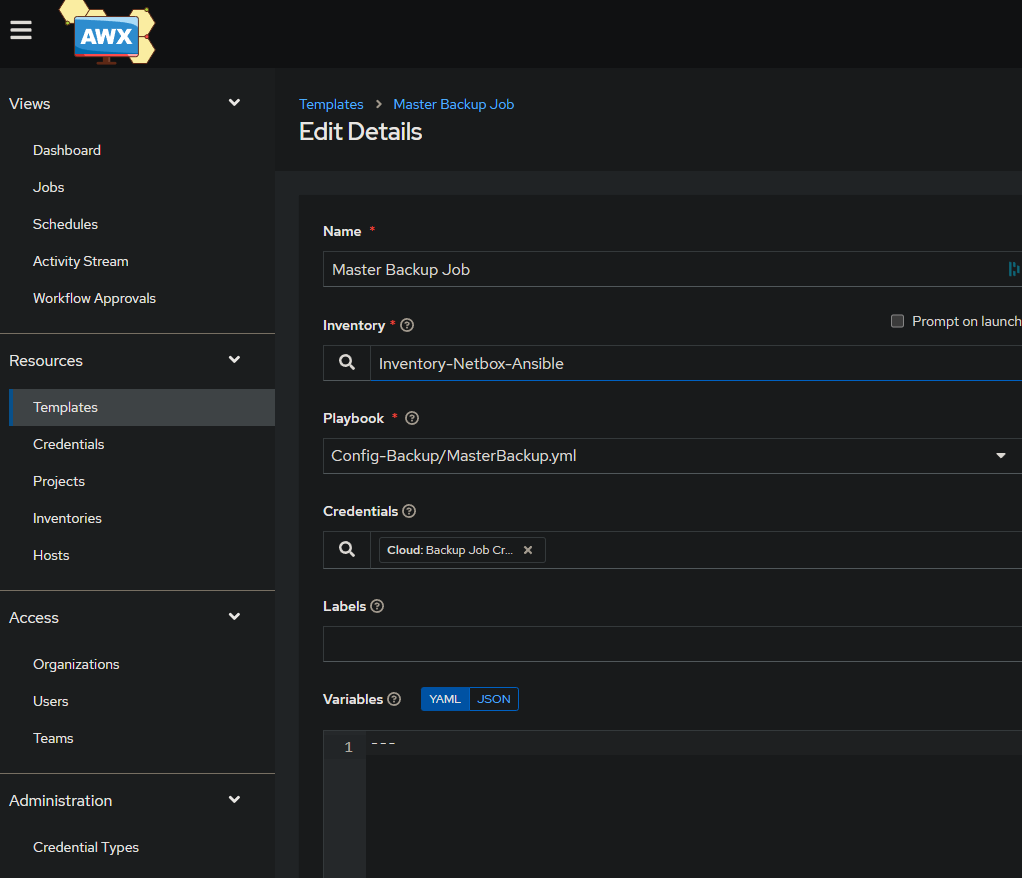
      Using Custom Credential in a job template

      • Navigate to the Templates: Click on “Resources” in the sidebar, then go to “Templates” and click on the template you wish to add the credential
        83c9772a-e2be-4454-ae4a-7e514e9fca1d-image.png

      The Variable you define in the injector configuration is how you will use the new credential in your playbook:

      ---
      - name: Backup config to SFTP Server
        hosts: opnsense
        ignore_unreachable: true
        vars:
          ansible_user: "{{ opnsense_username }}"
          ansible_password: "{{ opnsense_password }}"
      

      Best Practices for Custom Credential Types

      • Secure Input Fields: Mark sensitive fields as secret to protect them.
      • Consistent Naming: Use descriptive names for credential types to avoid confusion.
      • Regular Updates: Periodically update credentials to maintain security.
      posted in Automation
      DerMeldosD
      DerMeldos
    • Debian/OpenSSH || SSH Key-Pair Authentication

      Configure SSH server to login with Key-Pair Authentication.
      Create a private key for client and a public key for server to do it.
      Create Key-Pair by each user, so login with a common user on SSH Server Host and work like follows.

      root@AWX0708:~# ssh-keygen
      Generating public/private rsa key pair.
      Enter file in which to save the key (/root/.ssh/id_rsa): 
      Enter passphrase (empty for no passphrase): 
      Enter same passphrase again: 
      Your identification has been saved in /root/.ssh/id_rsa
      Your public key has been saved in /root/.ssh/id_rsa.pub
      The key fingerprint is:
      SHA256:pqzEJ90xi63D5M9GqH/iG3fDOjc53XXK1nqS/1rnPUI root@AWX0708
      The key's randomart image is:
      +---[RSA 3072]----+
      |                 |
      |                 |
      |                 |
      |                 |
      |       .S        |
      |   . oo*.=   E  o|
      |    +=B.= +o.o =+|
      |   ..+==+o=...B+=|
      |    .o=B+o o .+*B|
      +----[SHA256]-----+
      root@AWX0708:~#
      
      root@AWX0708:~# ls -l ~/.ssh
      total 20
      -rw-r--r-- 1 root root  566 Jun  1 05:03 authorized_keys
      -rw------- 1 root root 2602 Nov  2 16:09 id_rsa
      -rw-r--r-- 1 root root  566 Nov  2 16:09 id_rsa.pub
      -rw------- 1 root root 2684 Nov  2 16:05 known_hosts
      -rw------- 1 root root 1848 Nov  2 16:05 known_hosts.old
      root@AWX0708:~# 
      

      Transfer the private key created on the Server to a Client, then it's possible to login with Key-Pair authentication.

      ssh-copy-id username@remote_host
      

      if ssh-copy-id is not available use plain ssh:

      cat ~/.ssh/id_rsa.pub | ssh username@remote_host "mkdir -p ~/.ssh && touch ~/.ssh/authorized_keys && chmod -R go= ~/.ssh && cat >> ~/.ssh/authorized_keys"
      

      OPTIONAL:
      Disable Password Authentication on your Server

      sudo nano /etc/ssh/sshd_config
      
      ...
      PasswordAuthentication no
      ...
      

      this will disable it for all users, to only restrict specific users try matching;
      Try Match in sshd_config:

      Match User user1,user2,user3,user4
          PasswordAuthentication no
      

      Or by group:

      Match Group users
          PasswordAuthentication no
      

      Or by negation:

      Match User !root
          PasswordAuthentication no
      

      Reload the SSH service for changes to take affect.

      sudo systemctl reload ssh
      
      posted in Linux
      DerMeldosD
      DerMeldos
    • Remove key from known_hosts

      Remove key from known_hosts file:

      Open the terminal and type the following command:

      For all examples below just replace the value after -R:

      ssh-keygen -R server-name
      ssh-keygen -R server.ip.addre.ss
      ssh-keygen -R 202.54.1.5
      ssh-keygen -R server1.example.com
      

      Example Output:

      root@AWX0708:~# ssh-keygen -R 10.196.0.1
      # Host 10.196.0.1 found: line 8
      # Host 10.196.0.1 found: line 9
      # Host 10.196.0.1 found: line 10
      /root/.ssh/known_hosts updated.
      Original contents retained as /root/.ssh/known_hosts.old
      root@AWX0708:~# ssh ansible@10.196.0.1
      
      posted in Linux
      DerMeldosD
      DerMeldos
    • Write Text into a file and override any existing content

      To write the text into a file and overwrite any existing content in the file, use the "cat" command with a "EOF" marker. This approach ensures all lines are written exactly as you have provided. Here’s the command:

      cat << 'EOF' > /path/to/your/file
      This is my testfile!
      #looks like a test
      EOF
      

      Replace "/path/to/your/file" with the actual path of the file where you want to write this content.

      Explanation:

      • "cat << 'EOF' > /path/to/your/file"opens a Here Document to input the text.
      • Text within the "EOF" block is written verbatim to the specified file.
      • Any "$" symbols are escaped with "" to prevent variable expansion.
      posted in Linux
      DerMeldosD
      DerMeldos