WEIGEL FORUM
    • Categories
    • Recent
    • Tags
    • Popular
    • Users
    • Groups
    • Login
    1. Home
    2. DerMeldos
    3. Posts
    • Profile
    • Following 0
    • Followers 0
    • Topics 99
    • Posts 110
    • Best 0
    • Controversial 0
    • Groups 2

    Posts made by DerMeldos

    • QuickGuide: NGINX Reverse Proxy with HTTPS
      1. Install Nginx
        On Ubuntu/Debian:
      sudo apt update
      sudo apt install nginx
      
      1. Configure Reverse Proxy
        Create a new file:
        /etc/nginx/sites-available/uptime
      server {
          listen 80;
          server_name uptime.ricardoweigel.de;
      
          location / {
              proxy_pass http://127.0.0.1:3001;
              proxy_set_header Host $host;
              proxy_set_header X-Real-IP $remote_addr;
              proxy_set_header X-Forwarded-For $proxy_add_x_forwarded_for;
          }
      }
      

      Enable the config:

      sudo ln -s /etc/nginx/sites-available/uptime /etc/nginx/sites-enabled/
      sudo nginx -t
      sudo systemctl reload nginx
      

      Now, visiting http://uptime.ricardoweigel.de will show your service running on port 3001 without exposing the port.

      1. Add HTTPS with Let's Encrypt
        Use Certbot:
      sudo apt install certbot python3-certbot-nginx
      sudo certbot --nginx -d uptime.ricardoweigel.de
      

      It will automatically edit your config to redirect HTTP to HTTPS.

      Result:
      Users go to: https://uptime.ricardoweigel.de
      Internally forwarded to: http://127.0.0.1:3001
      Clean, professional, and secure.

      posted in Linux
      DerMeldosD
      DerMeldos
    • File Transfer

      PULL from remote:

      rsync -chavzP --stats remote_username@remote_host:path/to/remote_directory path/to/local_directory
      

      *rsync is only possible if the local AND remote machine have the package installed.
      **rsync option explanation: Ubuntu Wiki

      scp -r remote_username@remote_host:path/to/remote_directory path/to/local_directory
      

      *Recursively copy the contents of a directory from a remote host to a local directory

      SEND to remote:

      rsync -chavzP --stats path/to/local_directory remote_username@remote_host:path/to/remote_directory 
      

      *rsync is only possible if the local AND remote machine have the package installed.
      **rsync option explanation: Ubuntu Wiki

      scp  path/to/local_file remote_username@remote_host:path/to/remote_file
      
      posted in Linux
      DerMeldosD
      DerMeldos
    • SecureCRT open new tab instead of open new window

      Step 1: Find SecureCRT Configuration Paths containing the file Global.ini
      Open SecureCRT > Options > Global Options > General > Configuration Paths

      Copy Configuration Folder and open this folder > find file Global.ini

      Step 2: Open Global.ini and change Single Instance value to 00000001
      Search for the line in Global.ini with the following text:

      ....
      D:"Single Instance"=00000000
      ....
      

      Change to

      ....
      D:"Single Instance"=00000001
      ....
      

      Save Global.ini file and test

      posted in Automation
      DerMeldosD
      DerMeldos
    • update podman image (Ansible AWX Custom EE)

      the virtual environment is located in /root/venv-ee

      root@TESTVM:~# cd venv-ee/
      

      enter the environment:

      root@TESTVM:~/venv-ee# source bin/activate
      

      edit your files, for example:

      (venv-ee) root@TESTVM:~/venv-ee/ee# vim requirements.txt 
      (venv-ee) root@TESTVM:~/venv-ee/ee# vim execution-environment.yml 
      

      Start building the new image:

      (venv-ee) root@TESTVM:~/venv-ee/ee# ansible-builder build -t weigel_awx_ee -v 3
      .......
      Complete! The build context can be found at: /root/venv-ee/ee/context
      

      Tag the local image:

      (venv-ee) root@TESTVM:~/venv-ee/ee# podman tag localhost/weigel_awx_ee:latest quay.io/rweigel/weigel_awx_ee
      

      Now you can push the latest image to your repo:

      (venv-ee) root@TESTVM:~/venv-ee/ee# podman push quay.io/rweigel/weigel_awx_ee:latest
      

      DONE!!!
      c6f6cf17-c6be-49d2-a0f8-9ce1babc7cbd-image.png

      posted in Linux
      DerMeldosD
      DerMeldos
    • SecureCRT Compatibility for Debian 12 and Ubuntu Version newer than 22.04 LTS

      install missing dependencies:

      wget http://mirrors.edge.kernel.org/ubuntu/pool/main/i/icu/libicu70_70.1-2_amd64.deb
      sudo dpkg -i libicu70_70.1-2_amd64.deb
      
      posted in Linux
      DerMeldosD
      DerMeldos
    • Create and Configure File Systems

      check and confirm the drive/partition you want to use.

      root@TESTVM:~# fdisk -l
      Disk /dev/sda: 32 GiB, 34359738368 bytes, 67108864 sectors
      Disk model: QEMU HARDDISK   
      Units: sectors of 1 * 512 = 512 bytes
      Sector size (logical/physical): 512 bytes / 512 bytes
      I/O size (minimum/optimal): 512 bytes / 512 bytes
      Disklabel type: dos
      Disk identifier: 0xd9de07a1
      
      Device     Boot    Start      End  Sectors  Size Id Type
      /dev/sda1  *        2048 65107967 65105920   31G 83 Linux
      /dev/sda2       65110014 67106815  1996802  975M  5 Extended
      /dev/sda5       65110016 67106815  1996800  975M 82 Linux swap / Solaris
      root@TESTVM:~# 
      

      RedHat -> xfs
      Ubunutu -> ext4

      mkfs.xfs /dev/sdb1
      mkfs.ext4 /dev/sdb1
      

      You can create a label for a new Filesystem using the -L option.

      mkfs.xfs -L "BackupVolume" /dev/sdb1
      

      b348547c-67bc-4b60-88d1-afc4b9ac5047-image.png

      using mkfs without any argument it will show you some option:
      66a6f198-9ff1-4916-97ae-75a5f20e7483-image.png

      The default behavior is not to override the existing filesystem. -f (force) option is available.
      e5db2857-95bf-4382-96ce-4d0315f58878-image.png
      labels chang be changed without overwriting the filesystem.
      170f4b52-3d47-40e9-9bcb-e5df55370ce7-image.png

      posted in Linux
      DerMeldosD
      DerMeldos
    • Ansible AWX Multiple Credentials for Play

      What Are Custom Credential Types?
      Custom credential types in AWX and AAP allow you to define new forms of credentials tailored to specific authentication needs. These can include SSH keys, API tokens, passwords, or any other unique authentication method required by your automation scripts. They are customizable templates that dictate how credentials are structured, stored, and used.

      Why Use Custom Credential Types?

      • Flexibility: Create credentials that match your specific needs.
      • Security: Ensure sensitive data is securely managed according to your organization’s policies.
      • Consistency: Standardize credentials across various automation tasks and environments.

      Creating Custom Credential Types in AWX/AAP

      • Log in to the AWX/AAP Web Interface: Open your browser and access the AWX dashboard.
      • Navigate to the Credential Types Tab: Click on “Administration” in the sidebar, then go to “Credential Types.” and click "Add"
        88e76524-da84-4686-ad68-757d505d0557-image.png

      Create a New Credential Type:
      Example:
      Name: BackupJob Credential Type

      Add the input_configuration arguments:

      fields:
        - id: arista_username
          type: string
          label: arista username
        - id: arista_password
          type: string
          label: arista password
          secret: true
        - id: opnsense_username
          type: string
          label: opnsense username
        - id: opnsense_password
          type: string
          label: opnsense password
          secret: true
      required:
        - arista_username
        - arista_password
        - opnsense_username
        - opnsense_password
      

      Add the injector Configuration: - This is what is used to inject the credential in to the playbook

      extra_vars:
        arista_password: '{{ arista_password }}'
        arista_username: '{{ arista_username }}'
        opnsense_password: '{{ opnsense_password }}'
        opnsense_username: '{{ opnsense_username }}'
      

      Using Custom Credential Types in AWX/AAP
      The new credential type will now to available for you to use as a template to create new credentials

      • Create a New Credential:
      • Navigate to the Credentials: Click on “Resources” in the sidebar, then go to “Credentials” and click "Add"
      • Give it a name and Description
      • Form the Credential Type dropdown choose the Template you just created
      • Add your credentials and save your new credential
        ccbaddc5-c7d2-430c-aa7f-cfb201f0bada-image.png

      Using Custom Credential in a job template

      • Navigate to the Templates: Click on “Resources” in the sidebar, then go to “Templates” and click on the template you wish to add the credential
        83c9772a-e2be-4454-ae4a-7e514e9fca1d-image.png

      The Variable you define in the injector configuration is how you will use the new credential in your playbook:

      ---
      - name: Backup config to SFTP Server
        hosts: opnsense
        ignore_unreachable: true
        vars:
          ansible_user: "{{ opnsense_username }}"
          ansible_password: "{{ opnsense_password }}"
      

      Best Practices for Custom Credential Types

      • Secure Input Fields: Mark sensitive fields as secret to protect them.
      • Consistent Naming: Use descriptive names for credential types to avoid confusion.
      • Regular Updates: Periodically update credentials to maintain security.
      posted in Automation
      DerMeldosD
      DerMeldos
    • Debian/OpenSSH || SSH Key-Pair Authentication

      Configure SSH server to login with Key-Pair Authentication.
      Create a private key for client and a public key for server to do it.
      Create Key-Pair by each user, so login with a common user on SSH Server Host and work like follows.

      root@AWX0708:~# ssh-keygen
      Generating public/private rsa key pair.
      Enter file in which to save the key (/root/.ssh/id_rsa): 
      Enter passphrase (empty for no passphrase): 
      Enter same passphrase again: 
      Your identification has been saved in /root/.ssh/id_rsa
      Your public key has been saved in /root/.ssh/id_rsa.pub
      The key fingerprint is:
      SHA256:pqzEJ90xi63D5M9GqH/iG3fDOjc53XXK1nqS/1rnPUI root@AWX0708
      The key's randomart image is:
      +---[RSA 3072]----+
      |                 |
      |                 |
      |                 |
      |                 |
      |       .S        |
      |   . oo*.=   E  o|
      |    +=B.= +o.o =+|
      |   ..+==+o=...B+=|
      |    .o=B+o o .+*B|
      +----[SHA256]-----+
      root@AWX0708:~#
      
      root@AWX0708:~# ls -l ~/.ssh
      total 20
      -rw-r--r-- 1 root root  566 Jun  1 05:03 authorized_keys
      -rw------- 1 root root 2602 Nov  2 16:09 id_rsa
      -rw-r--r-- 1 root root  566 Nov  2 16:09 id_rsa.pub
      -rw------- 1 root root 2684 Nov  2 16:05 known_hosts
      -rw------- 1 root root 1848 Nov  2 16:05 known_hosts.old
      root@AWX0708:~# 
      

      Transfer the private key created on the Server to a Client, then it's possible to login with Key-Pair authentication.

      ssh-copy-id username@remote_host
      

      if ssh-copy-id is not available use plain ssh:

      cat ~/.ssh/id_rsa.pub | ssh username@remote_host "mkdir -p ~/.ssh && touch ~/.ssh/authorized_keys && chmod -R go= ~/.ssh && cat >> ~/.ssh/authorized_keys"
      

      OPTIONAL:
      Disable Password Authentication on your Server

      sudo nano /etc/ssh/sshd_config
      
      ...
      PasswordAuthentication no
      ...
      

      this will disable it for all users, to only restrict specific users try matching;
      Try Match in sshd_config:

      Match User user1,user2,user3,user4
          PasswordAuthentication no
      

      Or by group:

      Match Group users
          PasswordAuthentication no
      

      Or by negation:

      Match User !root
          PasswordAuthentication no
      

      Reload the SSH service for changes to take affect.

      sudo systemctl reload ssh
      
      posted in Linux
      DerMeldosD
      DerMeldos
    • Remove key from known_hosts

      Remove key from known_hosts file:

      Open the terminal and type the following command:

      For all examples below just replace the value after -R:

      ssh-keygen -R server-name
      ssh-keygen -R server.ip.addre.ss
      ssh-keygen -R 202.54.1.5
      ssh-keygen -R server1.example.com
      

      Example Output:

      root@AWX0708:~# ssh-keygen -R 10.196.0.1
      # Host 10.196.0.1 found: line 8
      # Host 10.196.0.1 found: line 9
      # Host 10.196.0.1 found: line 10
      /root/.ssh/known_hosts updated.
      Original contents retained as /root/.ssh/known_hosts.old
      root@AWX0708:~# ssh ansible@10.196.0.1
      
      posted in Linux
      DerMeldosD
      DerMeldos
    • Write Text into a file and override any existing content

      To write the text into a file and overwrite any existing content in the file, use the "cat" command with a "EOF" marker. This approach ensures all lines are written exactly as you have provided. Here’s the command:

      cat << 'EOF' > /path/to/your/file
      This is my testfile!
      #looks like a test
      EOF
      

      Replace "/path/to/your/file" with the actual path of the file where you want to write this content.

      Explanation:

      • "cat << 'EOF' > /path/to/your/file"opens a Here Document to input the text.
      • Text within the "EOF" block is written verbatim to the specified file.
      • Any "$" symbols are escaped with "" to prevent variable expansion.
      posted in Linux
      DerMeldosD
      DerMeldos
    • GIT clone Private Repo

      firstly git needs to be installed.

      apt install git -y
      

      afterwards, configure your identity.

        git config --global user.email "you@example.com"
        git config --global user.name "Your Name"
      

      Now clone the repo.

      git clone https://personalaccesstoken@github.com/DerMeldos/WEIGEL-Ansible-Collection
      

      To create a Personal access token, visit the GitHub webpage and create a new token under Developer Settings.

      posted in Linux
      DerMeldosD
      DerMeldos
    • RE: Vi / VIM Cheat Sheet

      https://vim.rtorr.com for more details

      posted in Linux
      DerMeldosD
      DerMeldos
    • CheckMK || Docker Monitoring

      You need to pull the agent plug-in from your monitoring site at first.

      root@FILEFLOWS0734:~# wget http://10.73.136.132/monitoring/check_mk/agents/plugins/mk_docker.py
      

      Install the plug-in to the agents plug-in folder (usually /usr/lib/check_mk_agent/plugins).

      install -m 0755 mk_docker.py /usr/lib/check_mk_agent/plugins
      

      Note, that the docker Python library is required (not docker-py). At least Version 2.6.1 is necessary. You can easily check this by entering python on the command line:

      root@linux# python3
      Python 3.8.10 (default, Nov 26 2021, 20:14:08)
      [GCC 9.3.0] on linux
      Type "help", "copyright", "credits" or "license" for more information.
      >>> import docker
      >>> docker.version
      '5.0.3'
      

      If you now perform the service discovery in Checkmk and activate the changes, you should find some new services that affect the Docker node itself:
      69929559-f86d-4371-bfc9-99dead8d898b-image.png

      posted in Automation
      DerMeldosD
      DerMeldos
    • CheckMK || Linux Agent Default Port // Host is registered for TLS but not using it

      Error message:
      [agent] Host is registered for TLS but not using it, Got no information from host

      A possible reason is that a different program is already using the default port 6556.
      This can be checked with "ss"

      root@NETBOX0702:~# ss -tulpn | grep 6556
      tcp   LISTEN 0      4096               *:6556            *:*    users:(("systemd",pid=1,fd=54))
      

      To fix this we need to change the port of the interfering program or alter the port for the checkmk agent.

      To change the checkmk agent port:

      you must create (or edit) the file "/var/lib/cmk-agent/cmk-agent-ctl.toml" on the monitored host and add this line (The file doesn’t exist by default.):

      pull_port = 16556
      

      After that, do a systemctl restart cmk-agent-ctl-daemon.service.

      Create a rule for the Agent within the CheckMK Webview:
      Setup > Agents > Access to agents > TCP port for connection to Checkmk agent

      Example rule:
      7dfbd047-fea6-4ef1-a2bc-0c09f110c01f-image.png

      posted in Automation
      DerMeldosD
      DerMeldos
    • CheckMK || Single Sytemd Serivce Discovery and Monitoring Rule

      Setup > Services >Service discovery rules > Systemd single services discovery
      Press the "Add rule" button.
      Example rule:
      e179a087-804e-4a36-a43f-822ce6badfa8-image.png
      After creating the Discovery rule for the systemd service we need to define the monitoring rule.

      Setup > Services > Service monitoring rules > Systemd single services
      Press the "Add rule" button.
      Example rule:
      0cdaf25b-2161-48d6-a509-6552d81fdf3c-image.png
      we are using regular expressions to filter the Name of the service.
      CheckMK Docs || Regular expressions in Checkmk

      After you've done both the Discovery and Monitoring rule you can monitor specific systemd services.
      8d856506-f7f0-4519-bbf8-f539607a78ec-image.png

      posted in Automation
      DerMeldosD
      DerMeldos
    • CheckMK || Linux Agent Installation and Registration

      Download the agent file form you monitoring site manual or via HTTP:
      64206b21-be4e-4de2-b436-db962ab14e64-image.png

      wget http://10.73.136.132/monitoring/check_mk/agents/check-mk-agent_2.1.0p26-1_all.deb
      

      Now you can install the downloaded package.

      dpkg -i check-mk-agent_2.1.0p26-1_all.deb 
      

      Check Installation:

      root@QBIT0718:/tmp# cmk-agent-ctl --version
      cmk-agent-ctl 2.1.0p26
      

      Register the Agent to the Monitoring site:

      cmk-agent-ctl register --hostname QBIT0718 --server 10.73.136.132 --site monitoring --user agent_registration --password 'PXPNYQVBXCASQKITTQRB' --trust-cert
      

      Dabei ist der Host-Name hinter der Option --hostname exakt so anzugeben, wie zuvor beim Erstellen im Setup. Die Optionen --server und --site geben den Namen des Checkmk-Servers und der Instanz an. Der Server-Name darf auch die IP-Adresse sein, der Instanzname (hier mysite) entspricht demjenigen, den Sie im URL-Pfad der Weboberfläche sehen. Komplettiert werden die Optionen durch Name und Passwort des Automationsbenutzers. Wenn Sie die Option --password auslassen, wird das Passwort interaktiv abgefragt.

      posted in Automation
      DerMeldosD
      DerMeldos
    • FreeBSD/OPNsense SNMP over IPsec Tunnel

      With an out of the box configuration it is not possible to query SNMP or other similar services on the LAN interface address of a remote firewall running pfSense® software over a tunnel mode IPsec VPN connection.

      Fred Wright explained in a post to the m0n0wall mailing list on September 12, 2004 why this is, and it’s the same reason here.

      "Due to the way IPsec tunnels are kludged into the FreeBSD kernel, any traffic initiated by m0n0wall to go through an IPsec tunnel gets the wrong source IP (and typically doesn’t go through the tunnel at all as a result). Theoretically this shouldn’t be an issue for the server side of SNMP, but perhaps the server has a bug (well, deficiency, at least) where it doesn’t send the response out through a socket bound to the request packet. You can fake it out by adding a bogus static route to the remote end of the tunnel via the m0n0wall’s LAN IP (assuming that’s within the near-end tunnel range). A good test is to see whether you can ping something at the remote end of the tunnel (e.g. the SNMP remote) from the m0n0wall. There’s an annoying but mostly harmless side-effect to this - every LAN packet to the tunnel elicits a no-change ICMP Redirect."

      Most notably this is a problem for UDP services bound to all interfaces (*) and ICMP. In these cases, a reply uses the “closest” address to the client from the perspective of the system routing table. Without a route present matching the desired destination this results in using the IP address of the interface containing the default gateway.

      Service Binding Workaround
      Some services have options which make it possible to change the interface binding so that the daemon only binds to a specific interface or IP address (e.g. the IP address of the internal network on the local end of the VPN) on the firewall. The interface binding for SNMP, NTP, the DNS Forwarder, and several other services can be set in this way.

      With the daemon bound to only that specific address, that is also the only address it can use to reply, and thus it can generate the expected replies which will properly take the IPsec path back to the other end.

      Static Route Workaround
      If changing the service binding is not possible, or for full connectivity between the endpoints, use static routes to work around the situation.

      Note:
      When both endpoints must be accessed, a static route is required on each endpoint.

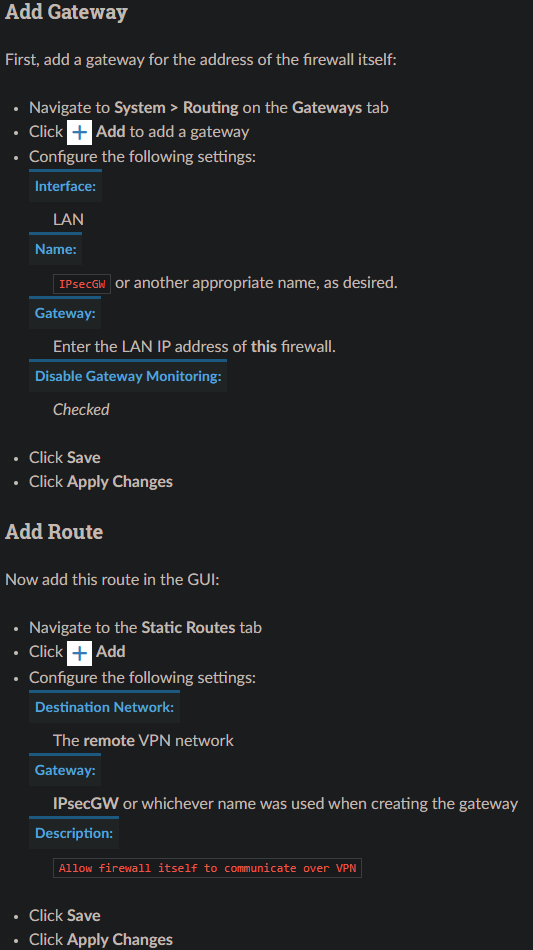
      Setting up a static route is done by first adding a gateway pointing to the LAN IP address of the firewall and then adding a static route using this gateway.

      efa10bee-0af6-4a67-958f-f4bc275c4fb3-image.png

      Test
      Perform a test using the address of the far side system and the local address that system is attempting to query.

      Routed IPsec (VTI)
      The previous advice in this document does not generally apply to route-based IPsec (VTI mode) since it operates in a fundamentally different way than policy-based IPsec (tunnel mode).

      With VTI mode IPsec the routing table contains proper routes back to the remote end using the VTI interfaces. Responses will utilize these routes to select the IPsec interface when looking up the path back across the tunnel.

      This may mean the remote end should query the address of the IPsec interface directly so that the responses are received from a matching address, but whether or not this is necessary depends on the service and client.

      posted in Networking
      DerMeldosD
      DerMeldos
    • List, Create, Delete, and Modify Physical Storage Partitions

      Basic Guide to List, Create, Delete, and Modify Physical Storage Partitions.
      ForumPost: Live resize root partition

      show Partitions:

      lsblk
      

      Example Output:

      root@PVE0302:~# lsblk
      NAME      MAJ:MIN RM   SIZE RO TYPE MOUNTPOINTS
      sda         8:0    0   1.7T  0 disk 
      ├─sda1      8:1    0   1.7T  0 part 
      └─sda9      8:9    0     8M  0 part 
      sdb         8:16   0   1.7T  0 disk 
      ├─sdb1      8:17   0   1.7T  0 part 
      └─sdb9      8:25   0     8M  0 part 
      sdc         8:32   0   1.7T  0 disk 
      ├─sdc1      8:33   0   1.7T  0 part 
      └─sdc9      8:41   0     8M  0 part 
      sdd         8:48   0   1.7T  0 disk 
      ├─sdd1      8:49   0   1.7T  0 part 
      └─sdd9      8:57   0     8M  0 part 
      sde         8:64   0 111.8G  0 disk 
      ├─sde1      8:65   0  1007K  0 part 
      ├─sde2      8:66   0   512M  0 part 
      └─sde3      8:67   0 110.5G  0 part 
      sdf         8:80   0   9.1T  0 disk 
      ├─sdf1      8:81   0     2G  0 part 
      └─sdf2      8:82   0   9.1T  0 part 
      sdg         8:96   0   9.1T  0 disk 
      ├─sdg1      8:97   0     2G  0 part 
      └─sdg2      8:98   0   9.1T  0 part 
      sdh         8:112  0 111.8G  0 disk 
      ├─sdh1      8:113  0  1007K  0 part 
      ├─sdh2      8:114  0   512M  0 part 
      └─sdh3      8:115  0 110.5G  0 part 
      zd0       230:0    0   128G  0 disk 
      ├─zd0p1   230:1    0   127G  0 part 
      ├─zd0p2   230:2    0     1K  0 part 
      └─zd0p5   230:5    0   975M  0 part 
      zd16      230:16   0     4M  0 disk 
      zd32      230:32   0    48G  0 disk 
      ├─zd32p1  230:33   0    47G  0 part 
      ├─zd32p2  230:34   0     1K  0 part 
      └─zd32p5  230:37   0   975M  0 part 
      zd48      230:48   0   4.5G  0 disk 
      zd64      230:64   0    32G  0 disk 
      ├─zd64p1  230:65   0    31G  0 part 
      ├─zd64p2  230:66   0     1K  0 part 
      └─zd64p5  230:69   0   975M  0 part 
      zd80      230:80   0    64G  0 disk 
      ├─zd80p1  230:81   0    63G  0 part 
      ├─zd80p2  230:82   0     1K  0 part 
      └─zd80p5  230:85   0   975M  0 part 
      zd96      230:96   0    32G  0 disk 
      ├─zd96p1  230:97   0    31G  0 part 
      ├─zd96p2  230:98   0     1K  0 part 
      └─zd96p5  230:101  0   975M  0 part 
      zd112     230:112  0    32G  0 disk 
      ├─zd112p1 230:113  0    31G  0 part 
      ├─zd112p2 230:114  0     1K  0 part 
      └─zd112p5 230:117  0   975M  0 part 
      zd128     230:128  0    32G  0 disk 
      ├─zd128p1 230:129  0    31G  0 part 
      ├─zd128p2 230:130  0     1K  0 part 
      └─zd128p5 230:133  0   975M  0 part 
      zd144     230:144  0    32G  0 disk 
      ├─zd144p1 230:145  0    31G  0 part 
      ├─zd144p2 230:146  0     1K  0 part 
      └─zd144p5 230:149  0   975M  0 part 
      zd160     230:160  0    32G  0 disk 
      ├─zd160p1 230:161  0    31G  0 part 
      ├─zd160p2 230:162  0     1K  0 part 
      └─zd160p5 230:165  0   975M  0 part 
      zd176     230:176  0   4.5G  0 disk 
      zd192     230:192  0   4.5G  0 disk 
      zd208     230:208  0   4.5G  0 disk 
      zd224     230:224  0    32G  0 disk 
      ├─zd224p1 230:225  0    31G  0 part 
      ├─zd224p2 230:226  0     1K  0 part 
      └─zd224p5 230:229  0   975M  0 part 
      zd256     230:256  0   150G  0 disk 
      ├─zd256p1 230:257  0   100M  0 part 
      ├─zd256p2 230:258  0    16M  0 part 
      ├─zd256p3 230:259  0 149.4G  0 part 
      └─zd256p4 230:260  0   524M  0 part 
      zd272     230:272  0    96G  0 disk 
      ├─zd272p1 230:273  0     1M  0 part 
      ├─zd272p2 230:274  0     2G  0 part 
      └─zd272p3 230:275  0    94G  0 part 
      zd288     230:288  0   4.5G  0 disk 
      zd352     230:352  0    64G  0 disk 
      ├─zd352p1 230:353  0     1M  0 part 
      ├─zd352p2 230:354  0     1G  0 part 
      └─zd352p3 230:355  0    63G  0 part 
      zd368     230:368  0   4.5G  0 disk 
      zd384     230:384  0    32G  0 disk 
      ├─zd384p1 230:385  0    31G  0 part 
      ├─zd384p2 230:386  0     1K  0 part 
      └─zd384p5 230:389  0   975M  0 part 
      zd432     230:432  0    32G  0 disk 
      ├─zd432p1 230:433  0    31G  0 part 
      ├─zd432p2 230:434  0     1K  0 part 
      └─zd432p5 230:437  0   975M  0 part 
      zd448     230:448  0    32G  0 disk 
      ├─zd448p1 230:449  0    31G  0 part 
      ├─zd448p2 230:450  0     1K  0 part 
      └─zd448p5 230:453  0   975M  0 part 
      zd480     230:480  0    32G  0 disk 
      ├─zd480p1 230:481  0     1M  0 part 
      ├─zd480p2 230:482  0   512M  0 part 
      └─zd480p3 230:483  0  31.5G  0 part 
      zd496     230:496  0    32G  0 disk 
      ├─zd496p1 230:497  0    31G  0 part 
      ├─zd496p2 230:498  0     1K  0 part 
      └─zd496p5 230:501  0   975M  0 part 
      zd528     230:528  0   4.5G  0 disk 
      zd544     230:544  0    50G  0 disk 
      ├─zd544p1 230:545  0    49G  0 part 
      ├─zd544p2 230:546  0     1K  0 part 
      └─zd544p5 230:549  0   975M  0 part 
      zd560     230:560  0    32G  0 disk 
      ├─zd560p1 230:561  0    31G  0 part 
      ├─zd560p2 230:562  0     1K  0 part 
      └─zd560p5 230:565  0   975M  0 part 
      zd576     230:576  0    32G  0 disk 
      ├─zd576p1 230:577  0    31G  0 part 
      ├─zd576p2 230:578  0     1K  0 part 
      └─zd576p5 230:581  0   975M  0 part 
      zd624     230:624  0    32G  0 disk 
      ├─zd624p1 230:625  0    31G  0 part 
      ├─zd624p2 230:626  0     1K  0 part 
      └─zd624p5 230:629  0   975M  0 part 
      zd656     230:656  0    96G  0 disk 
      └─zd656p1 230:657  0    96G  0 part 
      zd672     230:672  0    32G  0 disk 
      ├─zd672p1 230:673  0    31G  0 part 
      ├─zd672p2 230:674  0     1K  0 part 
      └─zd672p5 230:677  0   975M  0 part 
      zd688     230:688  0    32G  0 disk 
      ├─zd688p1 230:689  0    31G  0 part 
      ├─zd688p2 230:690  0     1K  0 part 
      └─zd688p5 230:693  0   975M  0 part 
      zd704     230:704  0    64G  0 disk 
      ├─zd704p1 230:705  0     1M  0 part 
      ├─zd704p2 230:706  0     2G  0 part 
      └─zd704p3 230:707  0    62G  0 part 
      zd720     230:720  0     1M  0 disk 
      

      Disks and partitions are located in /dev

      root@PVE0302:~# ls /dev/sda
      /dev/sda
      root@PVE0302:~# ls /dev/sda1
      /dev/sda1
      

      using fdisk to show a list of partitions on a blockdevices:

      root@PVE0302:~# fdisk --list /dev/sda
      Disk /dev/sda: 1.75 TiB, 1920383410176 bytes, 3750748848 sectors
      Disk model: SAMSUNG MZ7LM1T9
      Units: sectors of 1 * 512 = 512 bytes
      Sector size (logical/physical): 512 bytes / 512 bytes
      I/O size (minimum/optimal): 512 bytes / 512 bytes
      Disklabel type: gpt
      Disk identifier: CDD5A644-2E76-A940-95C4-8B57C5ACCCD5
      
      Device          Start        End    Sectors  Size Type
      /dev/sda1        2048 3750731775 3750729728  1.7T Solaris /usr & Apple ZFS
      /dev/sda9  3750731776 3750748159      16384    8M Solaris reserved 1
      

      Start Modifying a drive:
      we are going to use the cfdisk utility for this since it is a bit easier and user-friendly.

      cfdisk /dev/sdb
      

      To create a new Partition highlight the "Free space" and select "New" at the bottom
      29a62d5c-60db-465f-94a3-a41a973eea1a-image.png
      you can now enter the desired space for the partition.

      In this View, you can delete a partition by highlighting it and selecting the "Delete" button.

      If you made any changes select "Write" to save them to the disk.
      46c6a5a8-a3ad-4cdf-898f-55d5f465e495-image.png

      posted in Linux
      DerMeldosD
      DerMeldos
    • NGINX basic Load Balancer examples
      sudo vim /etc/nginx/sites-available/lb_example.conf
      

      Round Robin config example:

      upstream mywebservers {
      	server 1.2.3.4;
      	server 5.6.7.8;
      }
      
      	server {
      		listen 80;
      		location / {
      			proxy_pass http://mywebservers;
      		}
      	}
      

      To make it balance it to the least busy server:

      upstream mywebservers {
      	least_conn;
      	server 1.2.3.4;
      	server 5.6.7.8;
      }
      
      	server {
      		listen 80;
      		location / {
      			proxy_pass http://mywebservers;
      		}
      	}
      

      To priorities server, you can use weights:
      - default weight is 1

      upstream mywebservers {
      	least_conn;
      	server 1.2.3.4 weight=3;
      	server 5.6.7.8;
      }
      
      	server {
      		listen 80;
      		location / {
      			proxy_pass http://mywebservers;
      		}
      	}
      

      Conf Example Including non-active backup:

      upstream mywebservers {
      	least_conn;
      	server 1.2.3.4 weight=3;
      	server 5.6.7.8;
      	server 10.20.30.40 backup;
      }
      
      	server {
      		listen 80;
      		location / {
      			proxy_pass http://mywebservers;
      		}
      	}
      

      Conf Example for different Listening Ports of Servers:

      upstream mywebservers {
      	least_conn;
      	server 1.2.3.4:8081 weight=3;
      	server 5.6.7.8;
      	server 10.20.30.40:8080 backup;
      }
      
      	server {
      		listen 80;
      		location / {
      			proxy_pass http://mywebservers;
      		}
      	}
      
      posted in Linux
      DerMeldosD
      DerMeldos
    • NGINX basic Reserve Proxy

      NGINX and dependencies should already be installed.

      sudo vi /etc/nginx/sites-available/proxy_example.conf
      
      server {
      	listen 80;
      	location /{
      		proxy_pass http://1.1.1.1;
      	}
      }
      

      Proxied:
      example.com/images
      example.com/text
      example.com/video

      Webserver defined under proxy_pass like: proxy_pass http://webserver1.example.com

      Only for /images proxying

      server {
      	listen 80;
      	location /images{
      		proxy_pass http://1.1.1.1;
      	}
      }
      

      Proxied:
      example.com/images/dog.jpg
      example.com/images/animals/cat.jpg

      to log user information for statistical reasons

      server {
      	listen 80;
      	location /{
      		proxy_pass http://1.1.1.1;
      		include proxy_params;
      	}
      }
      

      This includes Instruction specified in another file:

      cat /etc/nginx/proxy_params
      
      proxy_set_header Host $http_host;
      proxy_set_header X-Real-IP $remote_addr;
      proxy_set_header X-Forwarded-For $proxy_add_x_forwarded_for;
      proxy_set_header X-Forwarded-Proto $scheme;
      

      Enable "Website" via softlink:

      sudo ln -s /etc/nginx/sites-available/proxy_example.conf /etc/nginx/sites-enabled/proxy.conf
      

      Disbale Default (this is normaly also a softlink so no files will be lost):

      sudo rm /etc/nginx/sites-enabled/default
      

      Check Config files for errors:

      sudo nginx -t
      

      "-t" parameter tells nginx to test config files

      Example Output:

      nginx: the configuration file /etc/nginx/nginx.conf syntax is ok
      nginx: configuration file /etc/nginx/nginx.conf test if successful
      

      proxy.conf will not be shown in the output but will still be tested

      posted in Linux
      DerMeldosD
      DerMeldos